
I am so thrilled to be invited to give a tutorial at The CSI Project. I love this blog because they host exciting challenges and features such wonderful crafts and decors! You might want to check them out and join the fun!
Today, as I promised, I will share you a tutorial of my another dryer sheets project.
Winter holds a special place in my heart. It is the season when I married the man who rocked my world! Making this project gave a nostalgic feeling of my wedding.

With all the materials available around the house plus my leftovers last Christmas, I decided to make this!

What I love about dryer sheet is, it very cheap (well, after drying the clothes), but also a good substitute for fabric lace or ruffles.

2. I made a running stitches.
3. Pull it down to create ruffles.
4. ....until you made enough strips to make flower petals. Make as many as you can.
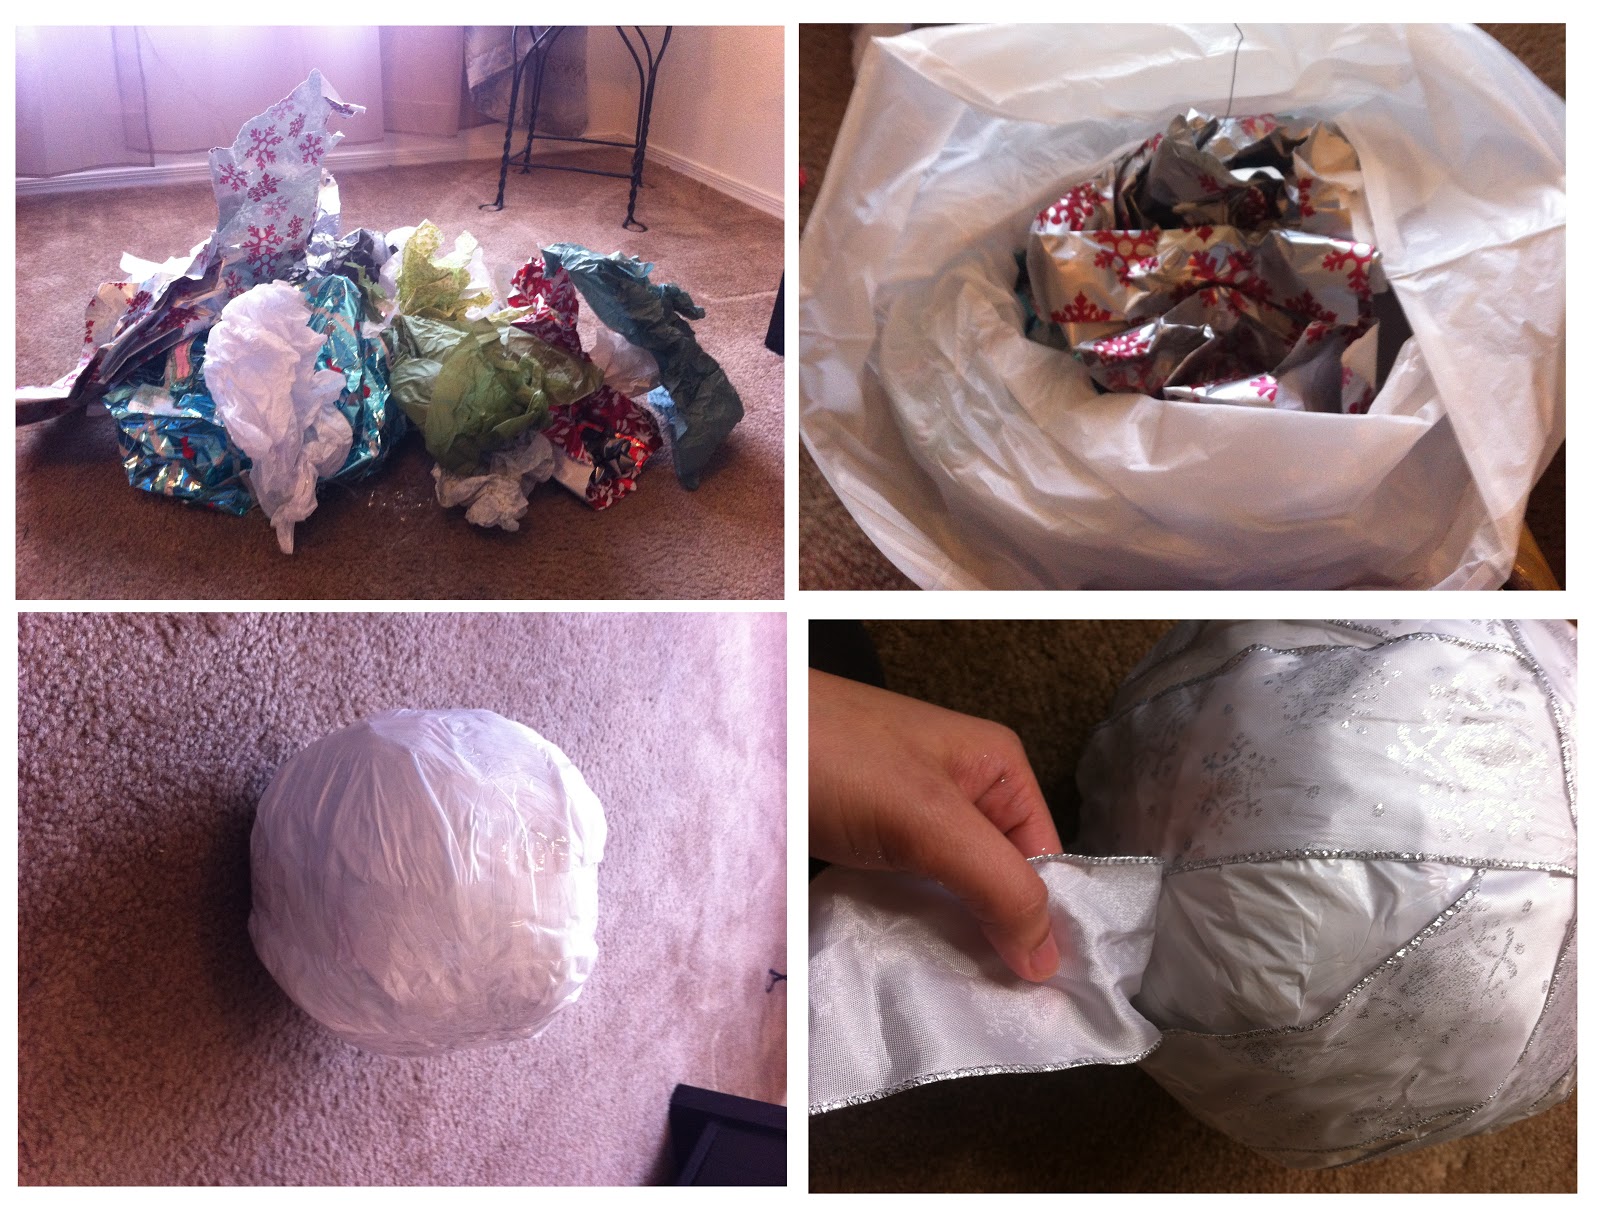
I stuffed my saved gift wraps from last Christmas into a white garbage bag and made a ball as big as volleyball. I taped it around to secure a ball shape. Then, I wrapped it with sparkly snowflake ribbon.

* Like I said, Christmas lights is optional. I just love the effect that the Christmas lights gives.
* Wrap the ball inside a tulle loosely like it is in a small sack.
* Collect a handful of loose tulle and tie it with a rubber band. Do this around the ball until there are no loose fabric left. White rubber band is better. I just happen to have black that time.
*The fun part is to cut the tip and stretch it to make a tulle flower effect. It's like giving a haircut!
note:
I was afraid of that this could be a fire hazard. I asked my husband's opinion first before making it. As man of safety, he wasn’t too alarmed with the idea though. However, I wrapped it in fabric ribbon first before I wrap it with lights so it is not directly exposed to plastic and papers. Safety wise, I guess you can use LED lights with as little amount of bulbs and choose lights that are tested safe. I keep mine lit while we are awake and turn it off before we go to bed, however, you can enjoy it too without lights as extra precaution.

I hot glued furniture nails as a decorative accent and as center of the flowers.


I just love snowflake ornaments from my wedding leftovers. I used them as hanging embellishments for this lantern which gave a snowfall effect.
I made a ring out of metal wire and wrapped it with white ribbon to make it invisible when I attached it to the bottom of lantern by sewing it on. I then tied the ornaments with strings on to the ring. The strings must be inconsistent in length.
You are now ready to hang your lantern! Enjoy it day...

....and night :)

I hope this project inspired you to create something beautiful out of recycled stuff!
Till the next post!!

Till the next post!!


Love your creativity!!! A wonderful up cycle, Laura
ReplyDeleteGreat idea Myric! I really love it with the lights on. Awesome as usual. I have a blog award for you on my page, stop by to pick it up if you want! : )..
ReplyDeleteFANTASTIC!!! I am so Thrilled you shared such a gorgeous project that is also such a significant recycle at the Kiss & Tell party at my place! My big "Cause" this year is R3 (recycle, reuse, repurpose). I posted about it on new years day. Anyway, I'm pinning this beauty and will be featuring it on my Facebook page in the morning!!!
ReplyDeleteOh wow, fantastic, Myric!!! And I just went to see your guest post--congratulations!!! You are rockin', my friend!!!
ReplyDeleteXO
Cindy
Wow!!! You are soooo creative. I love this hanging light! I've put it on the to-do list.
ReplyDeleteThanks for the tutorial.
Have a great day,
Always, Queenie
Love it!!!! Very creative and good use of materials.......
ReplyDeleteSo creative, I love it!
ReplyDeleteNow That Is Creative & So Clever.... Love It~ Hope you will get a chance to stop by My Blog, having a Give~Away.
ReplyDeleteHave a wonderful weekend,
Cheryl
This is brilliant! What a great use of used dryer sheets! I'm going to start saving all of mine and try this!!
ReplyDeleteNancy
http://alifedesigned.blogspot.com/
It's really very nice , great idea !
ReplyDeleteI will try one to me , thanks for sharing it! :D
hugs from Brazil
Cintia ( Tin ) Fumagalli
I'm celebrating Winter today over on my Facebook page and I am featuring YOU! Thanks So much for linking up to Kiss & Tell over at I Gotta Create!
ReplyDeleteToday's feature: http://www.facebook.com/pages/Igottacreate/100573240032625?sk=wall
another great idea, beautifully executed - well done!
ReplyDeletehttp://partycraftsecrets.blogspot.com/
Myric, you never cease to amaze me.. THIS IS THE FAV from last week. SO dreamy and BEAUTIFUL.. I PINNED IT T W I C E.. LOVE LOVE LOVE... You are featured tonight ;)) Please stop in and snag a button.. THANK YOU SO MUCH for linking up last week. Hope you are back again this evening.. Wishing you an AMAZING evening..
ReplyDeleteHi Myric, This project is so brilliant! It's my pleasure to feature you in my Fab Friday Favorites today. Please feel free to take an "I Was Featured" button if you don't already have one. And please do come back again next Friday!
ReplyDeleteWarmly, MIchelle
Wow, TY for the tutorial. Dryer sheets, who would have thought, I just learned how to make a wreath from coffee filters.
ReplyDeleteWhat a great tutorial. It turned out lovely. Thanks for sharing at Restyled Sundays.
ReplyDelete